Times are changes.

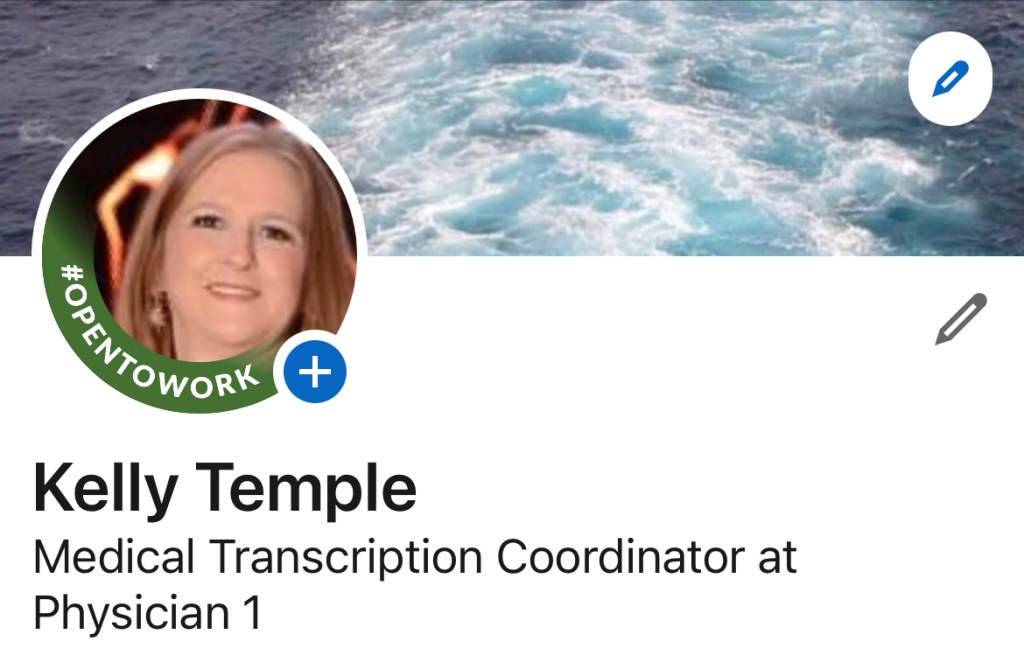
For the first time in a very long time, I find myself looking for a new job. I knew this day was coming, but I still feel so lost. But I know, the right decision has been made for the better good of the business and I back the decision 100% and then some.

I have done the proper thing by updating my LinkedIn profile. I only wish I could include things like hobbies and such. I wish I could include the different things I have made for my mom’s room at her assisted living facility. I even wish I could include that I’m an EXPERT at booking cruises, researching cruises, and basically talking about cruises. Most of the scrapbook pages I have created have been from cruises and I am extremely behind and getting them done. But, with things changing, I believe I will have more time to spend doing the things I love so dearly.

I have projects to complete, such as finishing the fall decorations for my mom’s apartment and starting on the Halloween decorations for her and the Christmas decorations, and the winter decorations.

I have a cruise countdown to look forward to! It’s still a long long time away, but I have already ordered one outfit specifically for the cruise. Hopefully, I will manage to get one or two cruises in next year.

But until then, I need to find a job. Preferably one I can do from home.

Although things are changing, I have hope for the future.

It’s one of those days…

Sometimes you just need to step away from your normal daily routine and do something else. Today was one of those days.

Today I decided that I would not work on any wreaths, or scrapbook pages, or anything else craft related. Instead, I spent some time with my granddaughter Victoria. Just like my other grandchildren, she brings me so much joy just being near her.

So, we started off with donuts!!! There is a donut shop, Sweet Donuts, not too far from the house so the plan was to go get donuts and relax a bit.

And then we went to Metro/T-Mobile!!!! Sometimes you just need to do the things!!!!

Now it is time to do my regular job and start worrying about not getting things done like I should!!!!! Oh well, there’s always tomorrow. Maybe I will just dream about our cruise in February…. of the year 2024!!!!!

Craft Project #20 – Eggstravaganza! Let the painting begin part four: all things glitter.

I am so glad I did not do this until the very last dozen eggs. It was definitely a learning experience. The supplies I used were Mod Podge, Clear Acrylic Sealer, and glitter from Hobby Lobby.

The first thing I did was to apply one coat of Anita’s All Purpose Acrylic Craft Paint in the color Vanilla cream. Once the eggs had dried, I started with the larger glitter then made my way to the extra fine glitter. Only 2 eggs for each glitter. I used Mod Podge as the adhesive. It did not take long to apply the glitter. And I decided on only one coat of glitter for this little experiment. Once all of the eggs were dry, I sprayed them with clear acrylic sealer.

I can honestly say I learned a lot from this project. For instance, the large glitter was not a good idea for this size of egg. Also, I definitely need to add additional coats of glitter on the eggs. But I was in a hurry and just wanted to get the eggstravangza over.

So now it is time to finish up a couple of spring crafts that I will put up at my moms apartment after the Easter decorations come down. After that, I will be making wreaths for Cinco de Mayo, Mothers Day, and Summer as well as other items here and there. But right now, I might need a little break.

Craft Project #23 – small Easter wreath for mom’s walker: part one.

I decided I would try something different for this project. I have seen lots of YouTube videos on making a wreath using plastic table covers. I had a small wreath on hand so I made my way to Dollar Tree and bout 3 plastic table covers that I thought I would work for what I had planned.

My first mistake was not paying attention to the design of the table cover. I thought it was solid Easter eggs. But it wasn’t. The Easter eggs are only on the edge.

Then the second mistake happened. Since I was using a small wreath form, I thought that strips 1 1/2 inches wide and 6 inches long would work perfectly. I was wrong. I wasted one plastic table cover. But that’s ok. I still had 2 left.

I moved on to another table cover and cut strips 1 1/2 inches by 7 inches long. This worked out well. So, I started to tie the strips to the wire wreath form. By the time I finished cutting and attaching the last plastic table, it became obvious that I did not purchase enough.

So now, I cannot finish this project until I am able to go to Dollar Tree and get some more Easter plastic table covers. I just hope I do not get distracted when I go there.

Craft Project #20 – Eggstravaganza! Let the painting begin part three: Blues and Greens

Note to self… I need more counter space for projects like this!!!

I started with the greens. I chose Folk Art Matte acrylic paint in the color Soft Apple, and Apple Barrel Matte acrylic paint in the colors Aquamarine and Key West. I applied three coats for each one.

For the blues, I chose Apple Barrel Matte Acrylic Paint in the colors Cloudless and Aqua Sky, and Anita’s All Purpose Acrylic craft paint in the color Morning Blue. I also used three coats for each one as well.

And now there is only one dozen eggs left. There is a possibility that I might try some glitter on them. I guess only time will tell.

Craft Project #22 – Cross wreath

This project definitely took a lot longer than I expected.

The supplies I used were rope and wire cross wreath form from Dollar Tree, word cutout and E6000 adhesive from Hobby Lobby, and Liquid Leaf in the color Classic Gold from Amazon.

I started by attaching the rope along the bottom wire of the cross using E6000 adhesive. I allowed it plenty of time to dry before I started weaving the rope through the different sections.

While I was waiting for the E6000 adhesive to dry, I painted the word cutout using the Liquid Leaf. It only took one coat of pain.

Once the weaving was complete, I place 2 pink daisy’s at the center of the cross and attached the work cutout in the center of the flowers.

Now it is done!!!! And I can go onto the next project. I apologize for not taking any pictures during the weaving process.

Craft Project #21 – Egg shape wire wreath turned into an Easter Basket wreath

I had an idea.. is it possible to make an egg shape wreath form look like an Easter basket??? Let’s find out.

The supplies: one egg shape wire wreath form, yarn, ribbon, flowers, bows from Dollar Tree, Yarn Bee Eternal Bliss yarn in the color white from Hobby Lobby, and scrap material left over from other spring/Easter craft projects.

I cut the paper strips down to 1/2 to3/4 x 7 inches. I had to decide how far up I want to use the fabric and then attached fabric strips just outside the brackets on each side. Using the Larks Head knot, I attached one fabric strip to the outer ring, then 2 fabric strips on the next ring, then 3 fabric strips, then 4 fabric strips on the last ring. I then attached fabric strips to the bottom section of the egg. My goal is to make this look like the lining in an Easter basket.

Once the bottom section was complete, I then used the Yarn Bee Eternal Bliss yarn to weave between the rings for the remainder of the wreath. This went real quick.

After I finished weaving the yarn on the wreath form, I cut out a piece of foam board and attached it to the back of the wreath. This will be used to attached the eggs to. After all, what’s an Easter basket without eggs????

I also attached a bow to the top of the wreath. This is a bow I made for a different project, but decided not to use. I also attached some of the Yarn Bee Eternal Bliss yarn to the top of the foam board.

I used Easter eggs purchased from Dollar Tree to fill the basket along with some left over pink Easter grass. I used Aleene’s Turbo Tacky Glue to attached the eggs to the foam board.

In no time at all, the wreath was completed and is ready to put up at my mom’s place when it is time to do the Easter decorating.

Craft Project #20 – Eggstravaganza! Let the painting begin part two: Pinks and Purples

This group of eggs took more than 2 coats to achieve the coverage I was wanting.

Started with 3 dozen plain white plastic eggs purchased on Amazon. I decided on 4 colors of acrylic paints I want to use. So, there will be 9 eggs of each color.

Group 1 paint color is Anita’s All Purpose Acrylic Craft Paint in the color Princess Pink.

Group 2 paint color is Apple Barrel matte acrylic paint in the color Pink Polish.

Group 3 paint color is Apple Barrel matte acrylic paint in the color Lilac Mist.

And the final group, group 4, paint color is Anita’s All Purpose Acrylic Craft Paint in the color Lavender.

I ended up doing one additional coat of paint on each egg. This seems to achieve the coverage I was looking for.

Now it is time to start the next group of paint colors. This will definitely take longer than the first 2 as I will be doing 6 dozen eggs using 6 different colors of paints.